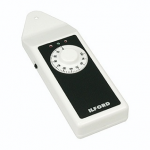
 The EM-10 uses a single 9v battery that seems to last forever. At least, I can’t remember the last time I put in a new one. Like all good gadgets, this one has LEDs–two red and one green. The lights allow you to know exactly when you have the correct density. You simply place the EM-10 on your easel, and position the sensor in the correct area of the projected image to measure. Then, slowly rotate the f/stop ring of your enlarger lens until the red LEDs go out and the green one comes on. At that point, you have the exact density needed to make the print.
Not only can you use the meter to zero in on the correct density setting for an unknown negative, you can also use it to allow you to change magnifications and still produce prints that exactly match in density. Just make your first print and then use those settings to program the EM-10. Then, set up the magnification you want for the next print (from that same negative) and place the sensor back in the same area where you programmed it; slowly turn the f/stop ring until the green light comes on, and you will have a perfect density match for your first print.
To program the EM-10, first you have to make a good print by trial and error. Place the sensor in an area of the image that you want to program. Next, with the enlarger’s f/stop ring, start slowly turning the meter’s control knob until the green light comes on. At that point, you have created a setting. Make a note of the number that the dial is pointing to. That number is the “program.” After that anytime the dial is set to that number the exposure time is the same (as what you used to create the trial and error print); and you are using the same emulsion batch of paper and developer–you will be able to reproduce the exact, density–regardless of the magnification–by adjusting the f/stop ring until the EM-10’s green light comes on again. Remember that the paper speed can vary a little from one emulsion batch to the next, and the brand, working strength, freshness, temperature, processing time and agitation of the paper developer all have an impact on print density.
When you expose film on a camera, there is a proper exposure for a given speed of film. If you provide more or less exposure, you might or might not get an acceptable image. This is also true for photographic paper. There is always a theoretically correct exposure for any given photographic paper. If you provide more exposure, you are simply overexposure the paper. You may or may not get an acceptable picture. The theoretically correct exposure level for any given photographic paper and negative combination can easily be determined. Simply make a series of test exposures until the edge of the film produces just barely solid black in the print. At that point any additional exposure is “overexposure” since you can’t produce a darker black. That point–this shade of black–is called Density Maximum. Yes, more exposure might bring up detail in the highlights that would otherwise be washed out in the print, but it will also obscure detail in the shadows as they get darker. However, if the film requires more exposure to bring up those highlight details, then, by definition, the film has been overexposed on the camera.
The EM-10 can be programmed for Density Maximum. After that, just place the sensor in the area of the edge of the film; set the dial to the correct Density Maximum program number, and adjust the f/stop until the green light comes on. You will then have an exposure for the paper that is theoretically correct. Obviously, you may have to further adjust it to deal with any over or under camera exposure on the film that might exist in the image that you are working with. But, at least you’ll know how close to correct the camera exposure was.
As a rule of thumb, I tend to overexposure on the camera all of my color negative work. Most color negative film will tolerate about four f/stops of overexposure before it starts to cause a loss of shadow and highlight detail in the finished print. Most black and white film is a little more sensitive and needs to be exposed more accurately if you are going to get the best that it has to offer. And, of course, slide film is the most sensitive of all. It needs to be exposed almost perfectly if you are to get good slides. Speaking of slides, the EM-10 works just as well when printing slides as when printing negatives.
Black And White Printing. When printing black and white negatives, the use of the density meter is pretty straightforward. After you have completed your trial and error testing, place the meter’s sensor in a smooth-toned area of the image and turn the meter’s dial until the little lights indicate that you have programmed the meter. Then, raise the enlarger head to the desired magnification and re-focus the enlarger. Next, place the meter sensor back in the same area of the image where you were before and this time, begin to slowly open the enlarger’s lens aperture until the little lights on the density meter indicate that the brightness is now the same as it was before.
You need to understand that a density meter does not measure contrast–at least not directly. If you want to measure the contrast range of a negative, you need to take a reading in the thinnest portion and the densest portion of the negative. Those two readings establish a ratio which can then be related to a contrast grade. Large ratios indicate high contrast; small ratios indicate low contrast. I’ve never been very successful at doing this. The trick to it is where you take the two readings. You want to take the highlight reading in an area of the print where there is just barely some tone value. That is very hard to determine when looking at the projected image on the easel.
With a little experience you will be able to create several programs in the density meter. I have programmed mine for a typical skin tone, and for D-max. Using the programs saves me a lot of trial and error testing since the density meter will tell me how to set the lens aperture before I even make the first test print, regardless of the magnification and/or the density of the negative. I use skin tones because their density level is more constant from one picture to the next than other things such as the sky, grass, trees, etc. Of course, there are all the variations of skin tones such as shadows and highlights as well as different density levels resulting from makeup, sun tanning, and ethnic and gender differences.
Of course, the density meter is not foolproof, so it is usually necessary to do a little trial and error testing. But, using the meter sure helps to reduce the amount of testing necessary.


 The EM-10 uses a single 9v battery that seems to last forever. At least, I can’t remember the last time I put in a new one. Like all good gadgets, this one has LEDs–two red and one green. The lights allow you to know exactly when you have the correct density. You simply place the EM-10 on your easel, and position the sensor in the correct area of the projected image to measure. Then, slowly rotate the f/stop ring of your enlarger lens until the red LEDs go out and the green one comes on. At that point, you have the exact density needed to make the print.