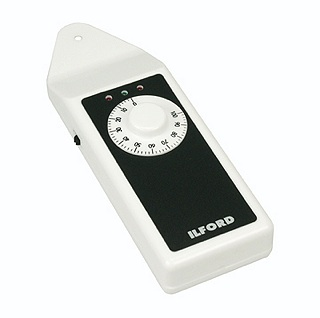
 The EM10 exposure monitor allows you to determine the exposure required for black and white and colour print making. It can be used when printing negatives or slides.
The exposure monitor also automatically compensates for the change in exposure for different density colour filters in the enlarger. It cannot however be used as a colour analyser.
The monitor is easy to use. Once calibrated – exposure determination from one slide to another, or from one black and white or colour negative to another – is simply a matter of measuring the light level of a particular area of the image, and then varying the enlarger lens until the green LED on the exposure monitor is lit.
The light-sensitive cell on the monitor is positioned so it is close to the enlarger baseboard during use, and accurately measures the amount of light received by the paper.
The EM10 exposure monitor operates with either a Duracell MN1604 (6LF22) or a PP3 (6F22) battery (or a rechargeable nickel cadmium battery).
Calibrating the ILFORD EM10 Exposure Monitor
The calibration can be done by using one of two methods :
If you have not previously made prints
- Select a slide or a negative, typical of those you wish to print.
- Set the calibration knob to the calibration number on the base of the monitor.
- With the slide or negative and recommended filtration in the enlarger – adjust the enlarger height or obtain a 20x25cm (8×10″) image on the base board.
- In total darkness, except for the light in the enlarger, place the monitor on the enlarger baseboard. For negative printing, choose the brightest area of the image on the base-board still showing detail. For slide printing, the sensitive cell should be in a highlight area which just holds detail.
- Switch on the monitor and adjust the enlarger lens aperture until the green LED is lit. The enlarger lens may be set between F-stops for this purpose.
- Using a mask, make four 10×12.5cm (4×5″) test exposures on a 20x25cm sheet of paper. Suggested exposure times for black and white and colour negatives are 2, 4, 8, and 16 seconds.
- Process the print in fresh chemicals, following the manufacturers recommendations. If one of the exposure times has not produced a correct density print – repeat stage 6 and 7 using different exposures times until the correct density is obtained. When calibrating the monitor, judge only the density of the print – ignore colour balance.
- Note the correct exposure time and the calibration number. You have now established the correct exposure time and calibration number for this pack of paper.
If you have a slide or negative of known exposure for a particular enlargement
- Place the negative or slide and any filtration used in the enlarger. Adjust the degree of enlargement and lens aperture to match your exposure data.
- In total darkness, except for the light from the enlarger, place the monitor on the enlarger baseboard. For negative printing, choose the brightest area of the image on the baseboard still showing detail. For slide printing, the sensitive cell should be in a highlight area which just holds detail.
- Switch on the monitor and adjust the calibration knob until the green LED is lit.
- Note the calibration knob setting. You have now established the correct exposure time and calibration number for your darkroom conditions.
Using the ILFORD EM10 Exposure Monitor
- Ensure the calibration knob is set to the appropriate calibration number.
- In total darkness, except for the light from the enlarger, place the monitor on the enlarger baseboard. For negative printing, choose the brightest area of the image on the baseboard still showing detail. For slide printing, the sensitive cell should be in a highlight area which just holds detail.
- Switch on the monitor and adjust the calibration knob until the green LED is lit. The enlarger lens may be set between f-stops for this purpose.
- Expose the paper using the same exposure time that you used for the calibration negative or slide.
See the full instructions how to calibrate and use the ILFORD EM10 Exposure Monitor Instructions

