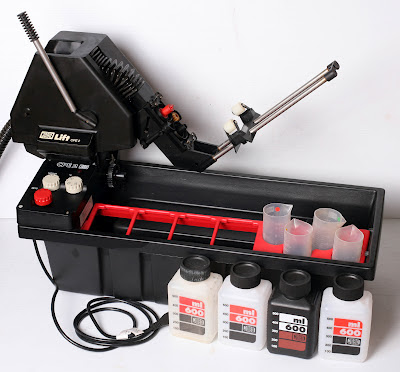
After some very intensive use, chemical spills start to appear in my JOBO CPE2 water bath during development. Also some gear noise. Deep repair advised…
Don’t be afraid to buy second-hand photographic equipment! Is just a matter to find the right repair info, decide if the equipment is repairable and if the costs are under control. If yes, buy it!
The JOBO CPE2 is very strong equipment to resist to time… mine has almost 40 years, and if you take the proper care, it will last for many years more!
When I brought the CPE2, no problems in processing. But after near 100 rolls, some chemicals spills start to appear due to the intensive use of the equipment, specially in the lift with moving parts subjected to wear. This is normal in equipments with more than 30 year and hundreds of hours of use!
I disassembled all the JOBO CPE2 lift, motor housing, electronics and all moving parts and did a complete refurbishing of all the major components. Also lubricated the motor and gears to leave the JOBO almost as new and a lot less noisy.
With no information in the web available about how to open and assembly/disassembly a JOBO Lift (at least I couldn’t find it), opening it for the first time was kind a challenge, specially because some rusty screws of the motor housing and some bad glue spread around in the previous repair!
Repairing the motor housing


First, unscrew the vertical inverted rear screw that fixes the upper lift housing to the lift base plate. Then, move the lift to the left of the tank so the lift front screws get out the fixing holes. Then take the lift out.
I’ll discuss the lift repair later.
With the lift disassembled, I found some particular situations. Quite bad quality repairing was already done… so… repairing was highly advisable.
The JOBO lift comes from the factory with no lift. The mount of the lift over the motor housing was done with Araldite glue. This was a definite job and blocks the motor housing opening. Absolutely not recommended!!!
To access to the motor housing fixing screws (which they where all with rust) they opened holes in the lift base plate to access it. Bad decision because this plate works also as tub for stoping any chemicals flow from the lift into the motor housing…
Removing the glue from the plate and the motor housing (believe me, this was a very hard job) cracked some of the housing cover plastic, but I finally could access the screws.
Because they were all full of rust, I had to carve holes around them! Finally the screws come out! But the lift tub and the motor housing cover were in some bad shape…
The original screws weren’t made from stainless steel and because there was holes carved in the lift plate, it’s why there is chemical corrosion! Go for shopping, found SS equivalents (the motor housing is fixed with 6 flat head metal screws).
To repair the bath tub base plate, I requested the best services of a great friend mine, which is also a DIY fan, very familiar with plastic rebuilding. They filled the holes and cracks with plastic putty, did a complete leveling and repainting. At the end, the base plate was like new!
After open the motor housing, I detected also that some chemicals spills over electronics. They oxidized the terminals connections, broke the fuse support and corroded some of the electronic circuit board.
First, I cleaned the housing, lubricated the motor with sewing machine oil, removed all the rust from the electronic board, exchanged the fuse support (check pictures at bottom), did a rebuild of the electronics soldering protection, finished it with nail varnish and exchanged the motor speed switch (they break after pulling the speed motor button, hard job to find a new one. I’ll publish references to whom need a new one).
Also, there is an original hole in the motor housing lateral area, possibly to receive a future manual fuse. I will replace the inner fuse support with exterior manual model in the future. For now, I filled it with an adapted rubber and exchanged the fuse support with a new one. The motor housing becomes chemically proof again.
After re-assembly all parts and closed the motor housing with new SS Screws, I lubricated the motor gear with mechanical putty used in fish gears (as recommended in JOBO manual).
Lift leaks repair


The lift presented some leaks caused by some plastic deformation along the time, between the inlet/outlet camera halves and the rotating pivot head.
The disassembly was done by unscrewing the fixing screws – 1 long screw for the pivot lift arm, then 2 long ones and 2 short ones – The repair done before I brought it, used some type of transparent silicone to make a gasket between the inlet/outlet head halves. When open, the gasket was completely destroyed.
I brought a special silicone for motor gaskets rebuilding (a special oil, chemicals and temperature resistant red silicone), and started to build the new gasket to fill the gap created by the plastic deformation in the inlet/outlet pivot camera.
New silicone was distributed along the lower part of the inlet/outlet cavity. Tape was fixed in the opposite side of the white pivot, so they don’t become glued to the cavity. Assembled the inlet/outlet head halves and the taped pivot, followed by a 24h cure. Disassembled again the head halves, take out the pivot head tape and checked the quality and functionality of the new molded gasket. If it is ok, is just a matter to fill the joint sections of the head halves with the red silicone and mount the halves together again with new screws (2 long and 2 small – I exchanged here also the screws with SS ones), tighten the screws softly until feel some tension. After another 24h cure, definitely tighten the screws to press the new gasket. This is the tip I found when building filling gaskets!
As you might imagine, my first try was a complete fiasco… but this is a trial and error learning process so, doing it again shown were the mistakes were made.
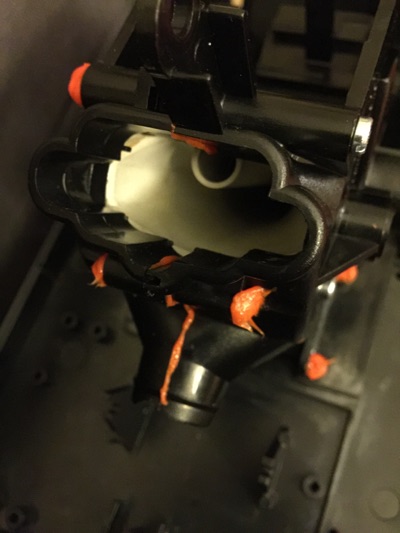
Repairing the flexible rubber neck
This part exists only to allow the head movement and block the chemicals flow into the lift housing. Is was also glued with Araldite and … in a wrong place… so I needed to take the glue out, clean it and glued it again with red silicone (great product!). I also changed the place of glue of the upper rubber part into a more strong one.
Some innovation
During the inspection of the motor housing cover, I found 4 plastic reinforced supports in the inner face with no holes on it. After align it with the lift base plate, I discovered the base lift plate could be screwed over these supports, with rubber rings and SS metal 4mm screws, with no need to use glue to assembly the lift with the motor base plate! I drilled a 3mm holes over each support and screwed the base plate over the motor housing cover with hand-made rubber rings (5 mm outside, 3mm inside diameter) and 4mm inner hexagonal SS metal screws. A very robust joint!
Finally, I lubricated the lift gear and the lift arm gears with gears grease and closed the lift head box.
I finish the lift assembly with the lift base plate over the motor housing, mounted the lift over the lift base plate and screwed the rear screw again.
That’s all!
Now I have a smooth and leak proof JOBO lift with a lot less noisy rotation gear!